隧道代理(全球HTTP)-超级机房池
**全球HTTP均不支持在中国大陆地区网络环境下使用**。
#### 一、介绍
超级机房池,顾名思义,其IP资源来自全球各地的大型数据中心,由知名的云计算服务商控制。
目前,数据中心池IP资源覆盖了全球100+个国家地区,日去重数达400W+,拥有高质的代理服务质量,能够稳定、可靠地满足用户的各类需求。
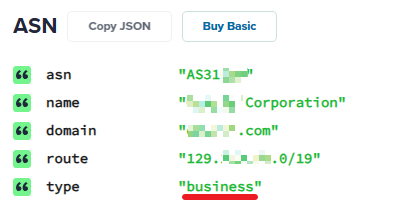
*超级机房池IP直接表现在IP信息上的是所属ASN的type类型为business(或hosting)。
#### 二、资源池特点
相比于住宅池,超级机房池
- 由知名云厂商统一管理控制,网络更加稳定
- 性价比更高,可以根据使用的流量计费,还提供不限流量套餐选择
#### 三、适用客户群
- 追求高性价比的客户
- 不要求住宅网络,更在意稳定性的客户
[开始选用【超级机房池】套餐>](https://www.qg.net/business/proxyip.html?region=overseas&product_type=3)
代理IP操作中的常见问题汇总
#### 单日最多获取IP数量和单次最多获取数量是多少?
动态IP每天可用的IP数量超过百万级,在通道数足够的情况下,短效代理通道提取方式单次最多可以申请100个IP,按量提取方式单次最多可以申请200个IP,为您的业务提供强大的助力;
静态IP最小的存活期为24小时,超过24小时后,客户可以自由地选择释放申请IP,静态IP一周只能更换2次。
#### IP是否支持文本提取,支持格式有哪些?
目前只能通过API获取,提取格式为JSON格式和TXT文本格式,暂不支持HTML网页格式,后期会上线该功能,敬请期待哦~
#### 提取不到IP?提示没有剩余的可用通道数?
当在申请IP时出现该提示,可通过调试工具的通道配额接口方法查看当前key的使用情况, 如果Available为0则表示当前AuthKey的可用通道数已被使用完;如果Available不为0,先到调试工具的【释放IP资源】进行通道IP的释放,再查询通道可用数。
#### 浏览器设置代理弹出【用户名:密码】对话框,提示要输入密码
出现这种问题有两种情况:
(1) 白名单IP授权模式下,绑定的不是使用代理的终端IP,或者绑定的不是固定出口IP;
(2)【用户名:密码】授权模式下,即使在后台绑定了终端IP授权,还是会弹出【用户名:密码】对话框的。
选择终端IP授权模式,并绑定使用代理的终端IP授权(固定出口IP),则可避免这种情况的发生。
#### 多久可以切换IP?最长可以用多久?
##### 1.多久可以切换IP
不同的代理套餐对应的IP切换时间不同,具体如下:
(1)短效代理
为系统根据所对应的套餐分钟数在到期后自动进行释放,不支持人工手动释放已申请的IP;
(2)独享代理
在已申请的IP地址使用时间大于30秒后才可进行释放;
(3)独享代理(地区锁)
IP可自主重拨,删除或释放IP需要添加线路12小时后才能执行;
(4)长效代理(静态IP高级版)
在已申请的IP地址使用时间大于24小时后才可进行释放。
##### 2.最长可以用多久?
不同的代理套餐对应的IP使用时长不同,具体如下:
(1)短效代理IP
受现有套餐存活期限的限制,目前单个IP最长仅支持使用30分钟;
(2)独享代理IP
目前单个IP最长支持使用24小时;
(3)长效代理IP
静态IP:24小时起,长期有效,不限制使用时间。
动态IP:数小时至数天,自然失效
#### 申请IP时的生存周期KeepAlive是否可以自动释放IP?
短效代理IP的释放由系统控制,无法手动释放;独享代理(地区锁)则在【IP管理】或调试工具重拨IP资源接可;
独享代理申请IP过程中的KeepAlive需自行设定的IP时长,可在套餐支持的时长0-1440分钟范围内填写合适的数字,默认24小时;
长效代理IP,静态IP高级版可以手动释放IP,一周2次机会,IP需使用24小时以上可操作释放。
#### 各套餐每天/每次最多能提取多少IP?
一通道代表着并发的意思,即一通道同一时间内最多仅有一个IP。通俗的解释,相当于客户购买拨号VPS去自己搭建代理IP;
##### 1.IP提取情况如下:
(1)独享代理IP
目前的存活期存在着最小1分钟的限制,最大存活期为24小时,也就是客户最快在申请当前IP后的1分钟可以释放该IP,并且又可以马上申请新IP。假设客户每个IP仅使用最短的1分钟时间,那 么一天最多可用IP的计算公式为24×60=1440个;
(2)短效代理IP
短效代理IP的存活期为系统控制,客户无法主动释放代理IP,如客户购买的是存活期1-5分钟的套餐,则其IP的存活时间为在1-5分钟内,在客户申请共享IP的时候,系统会返回其IP的deadtime(结束时间)。假设若存活时间结束后,客户马上申请新的代理IP,则其一天最多可用IP数为24×60=1440个,最小可用IP数为24×60/5=288个;
(3)长效代理IP
目前长效代理分为静态和动态两种子产品,动态IP自然失效,静态IP分为普惠版和高级版,普惠版IP固定不变,高级版IP最小的存活期为1天(可手动释放),目的是防止同行或某些客户滥用资源等情况。超过1天后,客户可以自由地选择更换其他IP。但是此类客户在IP可用情况下,一般不会进行更换IP。
##### 2.不同套餐IP的单次提取限制如下:
(1)短效、静态
套餐单次可提取IP数量=剩余可用通道数,单次最多可提取100个IP;
(2)短效(按量提取)
套餐单次可提取数量=剩余可用数量,单次最多可提取200个IP。
独享代理-使用指南-开发版
青果为有经验的开发者提供多种API接口及代码示例,以协助开发者更便利地使用代理。
本篇仅以【提取IP】这一操作为例,介绍如何使用API接口-代码方式来使用代理。
## 步骤总览

## 一、API鉴权与代理授权
青果支持开发者对API鉴权和代理授权验证进行自主管理,以下介绍这一阶段的操作
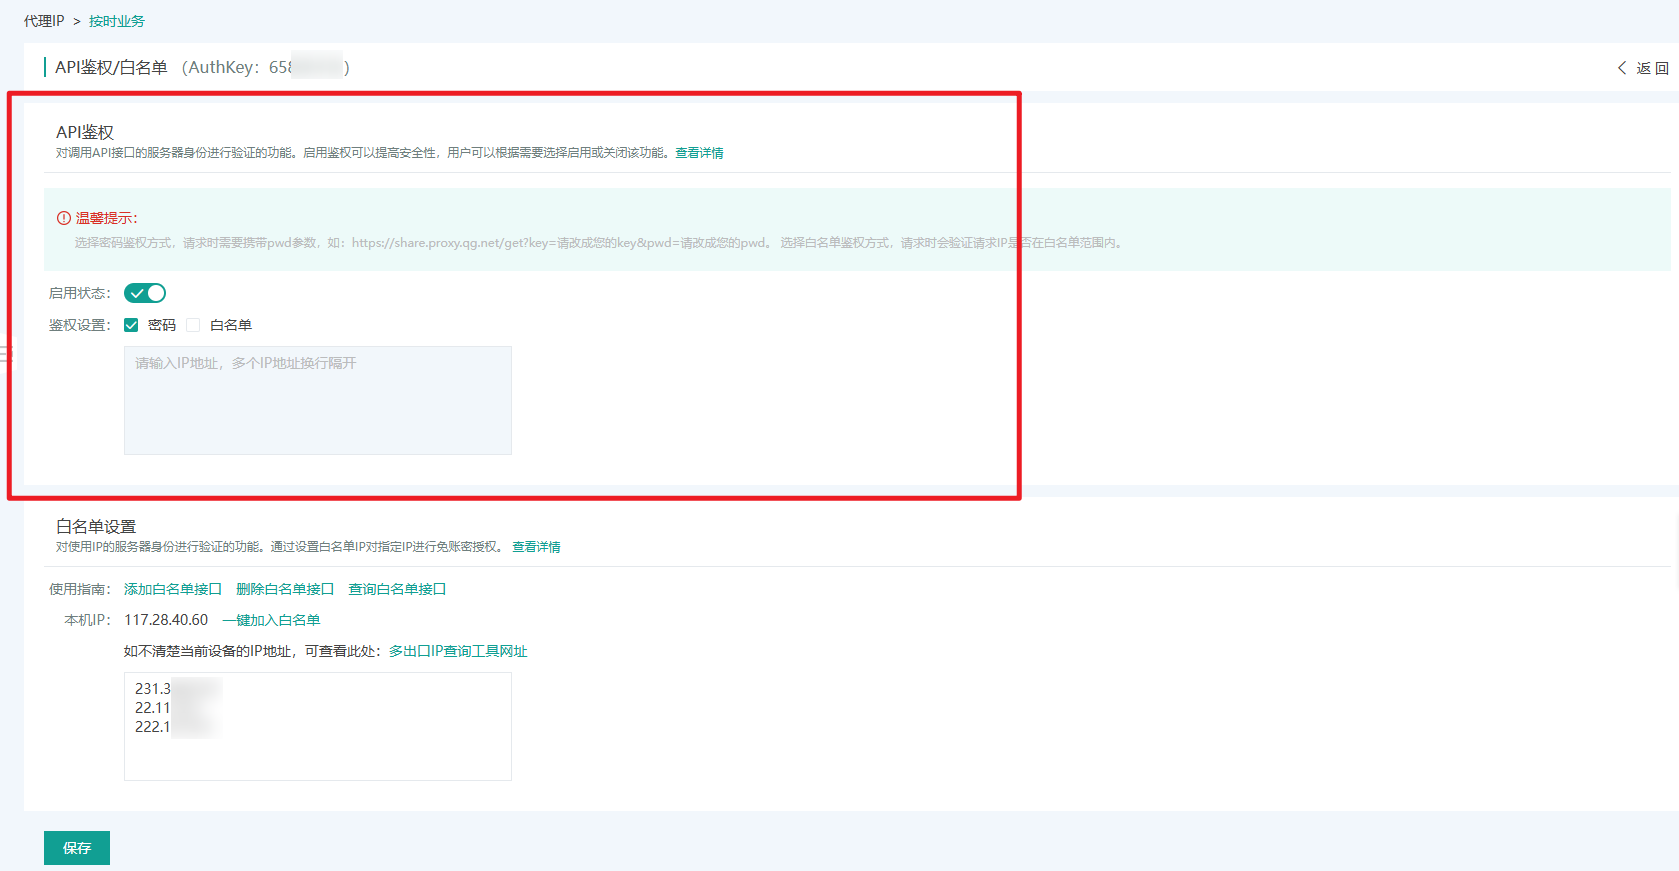
**API鉴权**是指对调用API接口的服务器身份进行验证的功能。启用鉴权可以提高安全性,用户可以根据需要选择启用或关闭该功能。
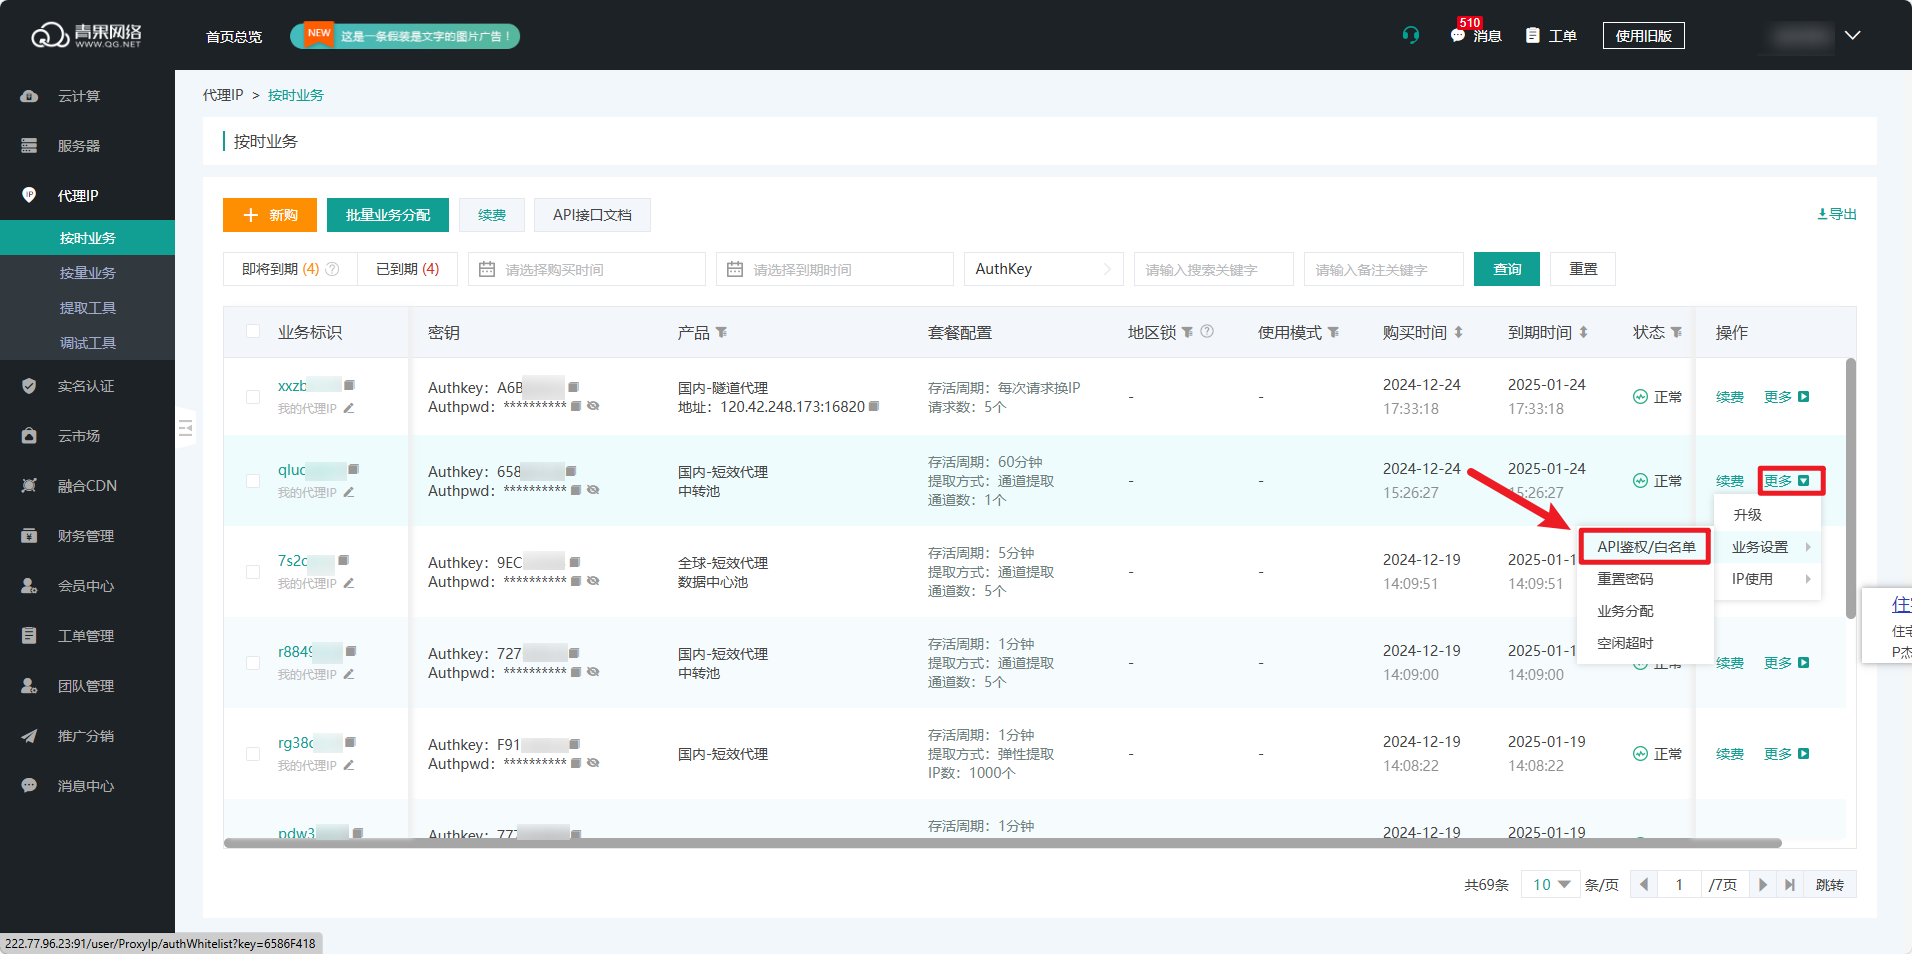
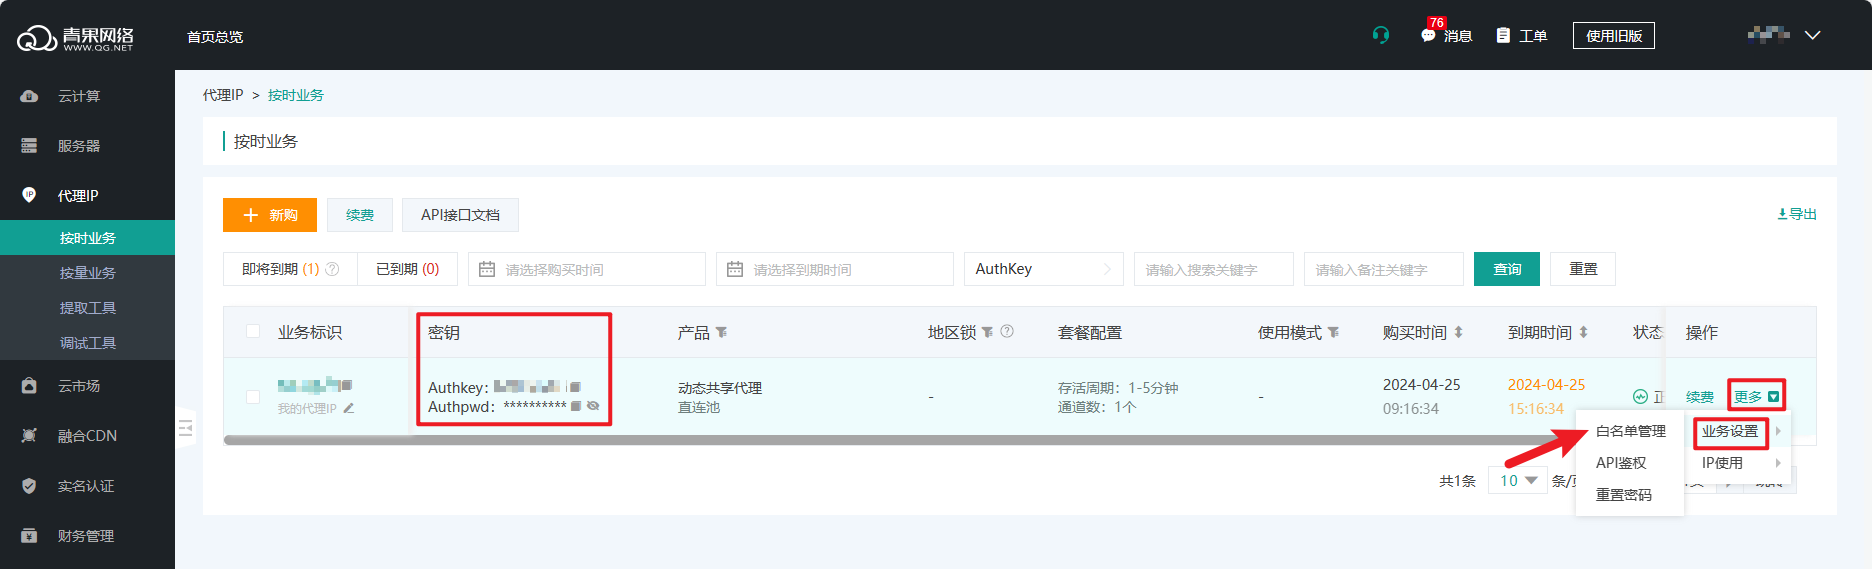
用户可根据意愿选择开启和关闭API鉴权(默认关闭),青果提供的鉴权方式有密码和白名单两种,在对应业务【操作】-【业务设置】-【API鉴权/白名单】中进行设置即可。
**代理授权验证**是指对代理身份进行验证,只有通过对应信息才能使用该代理IP,确保您的使用权益和安全性。
青果代理IP支持白名单和帐密两种验证方式,可自主选择使用。
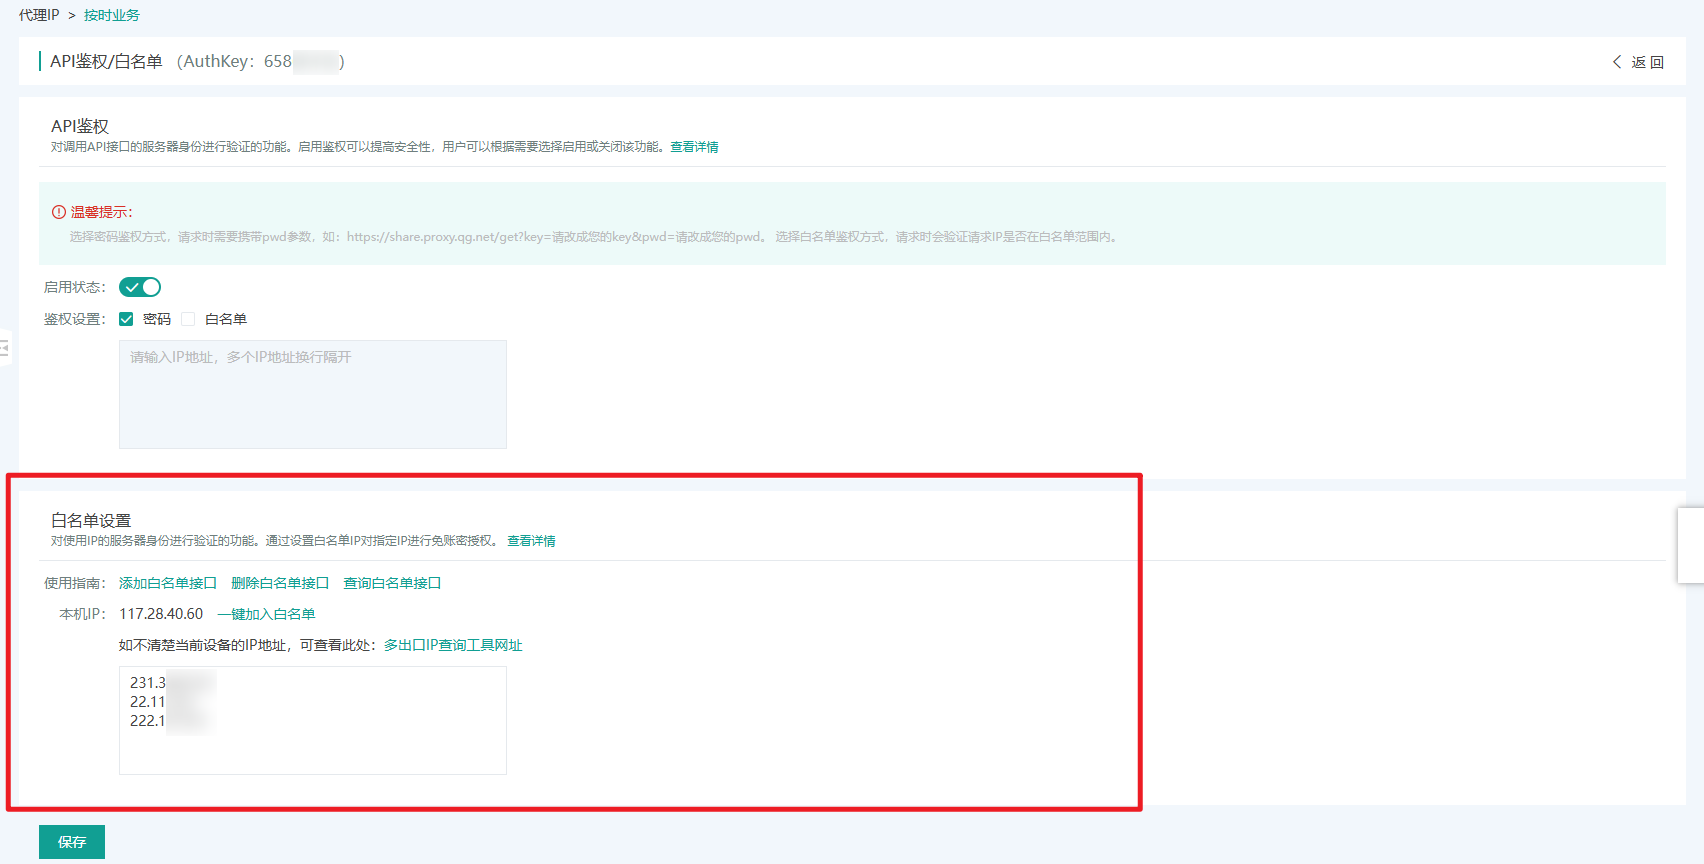
白名单模式,即把要实现代理的服务器IP添加进代理白名单中,后续使用该IP连接代理就能成功;
账密模式,即先获取该代理业务的账号密码信息,连接代理时填入账密进行验证就可使用代理。
白名单设置的入口与API鉴权一样。
详细步骤可查看>[如何使用API鉴权](https://www.qg.net/doc/2283.html)、[代理验证](https://www.qg.net/doc/1574.html)
## 二、获取api接口
青果给开发者提供两种方式来获得api接口
① 使用调试工具/提取工具
调试工具是青果为开发者推出的快速获取接口&调试的简便工具,传送门[>>调试工具](https://www.qg.net/tools/IPdebug.html)
使用调试工具,用户需要先在左侧栏目中选好产品及接口类型,并在右侧表格的参数值列中填写所需信息,便可在页面上方看到完整的【请求地址】,这便是提取IP的API接口。
点击【发送】还能快速调试,查看响应结果,确认该代理接口是否可用。
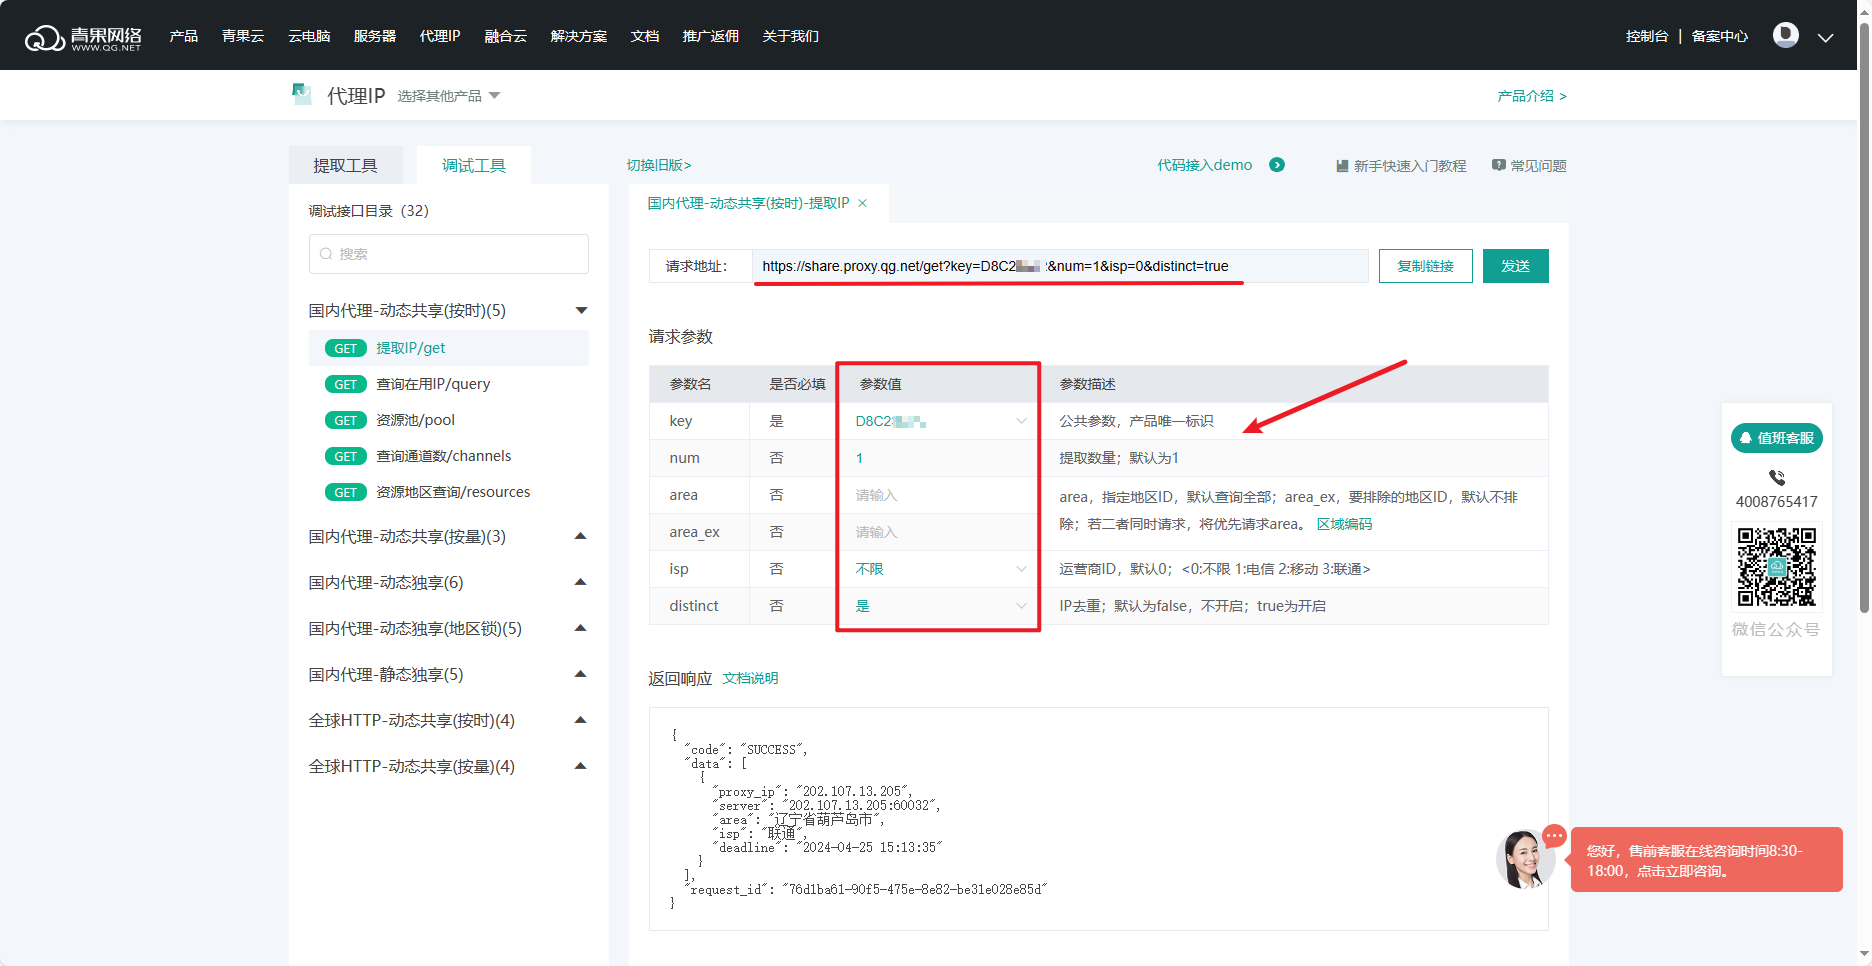
调试工具除了有提取IP接口,还提供查询在用IP、资源池、资源地区等接口。
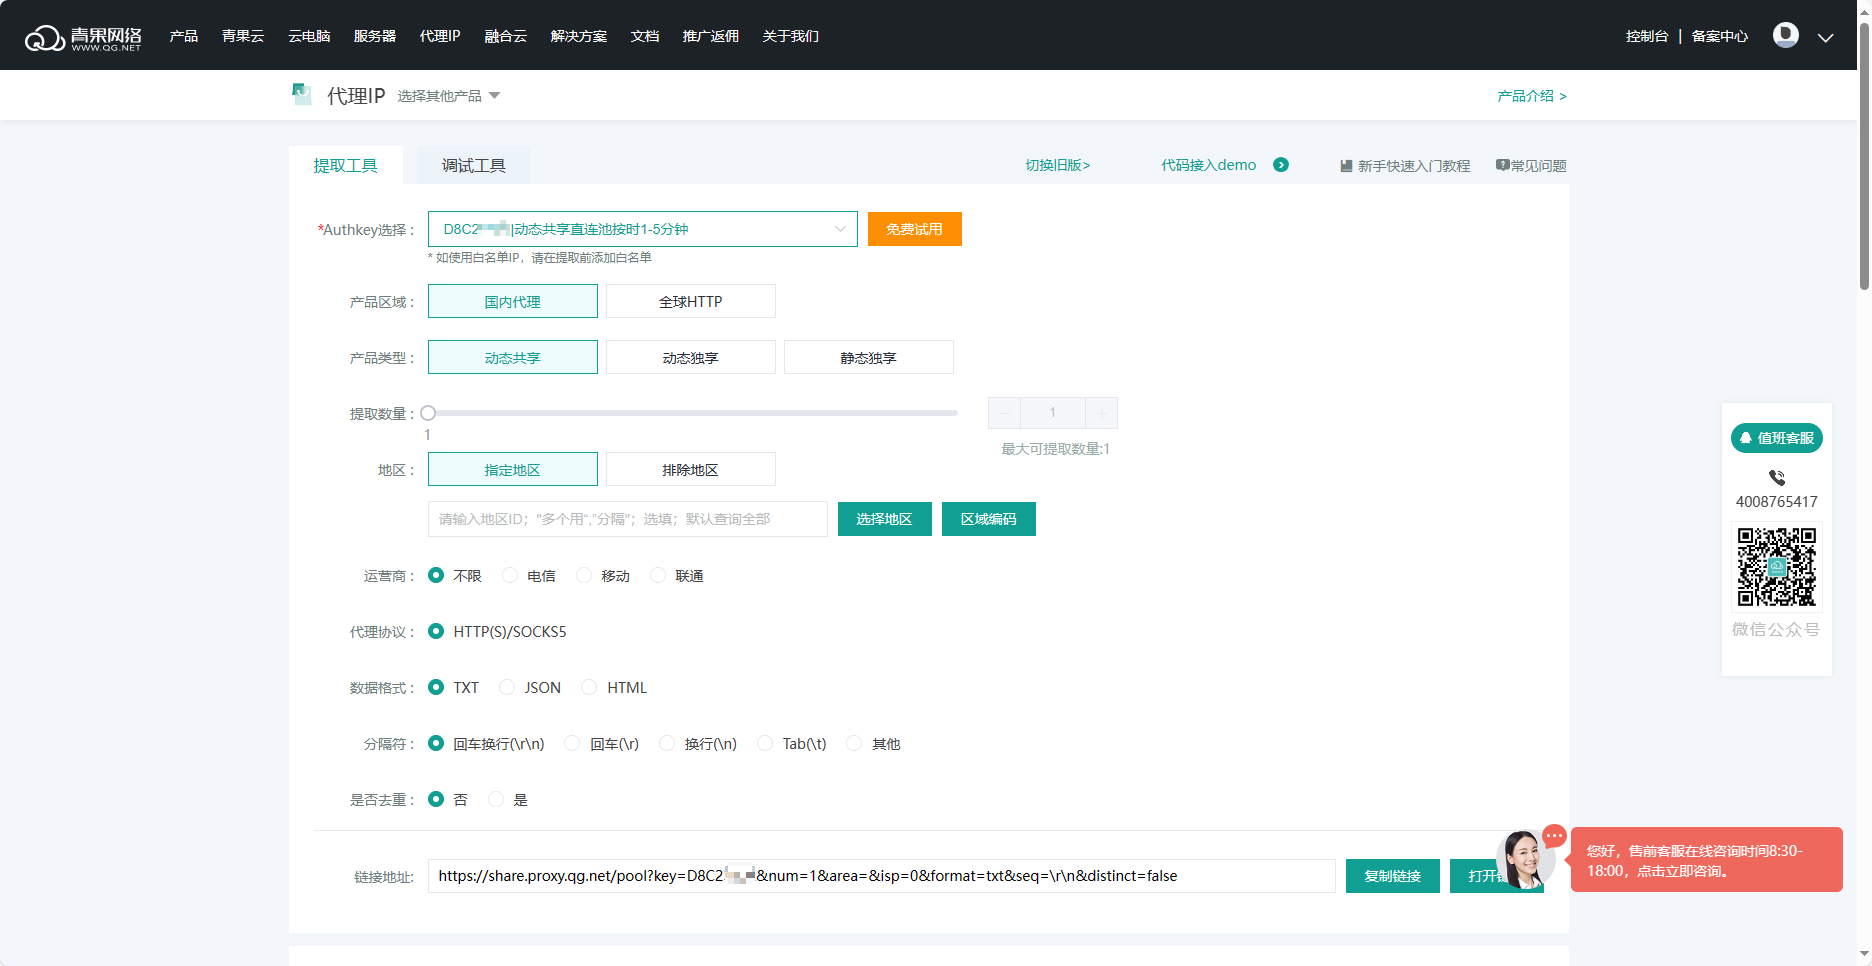
若只需要提取IP,也可以使用提取工具,进行简单的选择便可以获取一样的接口链接。传送门[>>提取工具 ](https://www.qg.net/tools/IPget.html)
② 查看api接口文档
除了简便工具,开发者也可以通过更原始的接口文档,自主编写所需的接口链接。
**[独享代理API接口文档 >](https://www.qg.net/doc/product/6_257_271_272/2141.html)**
**[独享代理(地区锁)API接口文档 > ](https://www.qg.net/doc/product/6_257_271_273/2142.html)**
## 三、代理测试
在代理服务器中打开命令行,输入相应的代理信息进行运行,若响应成功,则代理可用。
以下图为例,通过curl命令测试账密模式的代理结果,查询IP并成功响应。
`curl -x http://{authkey}:{authpwd}@{118.92.69.112}:{32105} {targetUrl}`

若响应不成功,可对应[错误码表](https://www.qg.net/doc/1838.html),排查问题。
## 四、编写采集程序
测试代理可用后,便可开始编写代理采集程序了。
青果提供了多种编程语言的代码示例供开发者参考,
详情查看
- [C语言代码示例](https://www.qg.net/doc/sdk/9_230/1694.html)
- [Go语言代码示例](https://www.qg.net/doc/sdk/9_230/1695.html)
- [PHP语言代码示例](https://www.qg.net/doc/sdk/9_230/1696.html)
- [Python语言代码示例](https://www.qg.net/doc/sdk/9_230/1697.html)
- [Java语言代码示例](https://www.qg.net/doc/sdk/9_230/1698.html)
- [Shell语言代码示例](https://www.qg.net/doc/sdk/9_230/1699.html)
- [C#语言代码示例](https://www.qg.net/doc/sdk/9_230/1700.html)
- [Node语言代码示例](https://www.qg.net/doc/sdk/9_230/1701.html)
**注:**青果代理IP产品都有相对应的IP存活周期,其有效时长是从提取到IP时算起,超过这个时长IP会失效。
长效代理-使用指南-开发版
青果为有经验的开发者提供多种API接口及代码示例,以协助开发者更便利地使用代理。
本篇仅以【提取IP】这一操作为例,介绍如何使用API接口-代码方式来使用代理。
## 步骤总览

## 一、API鉴权与代理授权
青果支持开发者对API鉴权和代理授权验证进行自主管理,以下介绍这一阶段的操作
**API鉴权**是指对调用API接口的服务器身份进行验证的功能。启用鉴权可以提高安全性,用户可以根据需要选择启用或关闭该功能。
用户可根据意愿选择开启和关闭API鉴权(默认关闭),青果提供的鉴权方式有密码和白名单两种,在对应业务【操作】-【业务设置】-【API鉴权/白名单】中进行设置即可。


**代理授权验证**是指对代理身份进行验证,只有通过对应信息才能使用该代理IP,确保您的使用权益和安全性。
青果代理IP支持白名单和帐密两种验证方式,可自主选择使用。
白名单模式,即把要实现代理的服务器IP添加进代理白名单中,后续使用该IP连接代理就能成功;
账密模式,即先获取该代理业务的账号密码信息,连接代理时填入账密进行验证就可使用代理。
白名单设置的入口与API鉴权一样。

详细步骤可查看>[如何使用API鉴权](https://www.qg.net/doc/2283.html)、[代理验证](https://www.qg.net/doc/1574.html)
## 二、获取api接口
青果给开发者提供两种方式来获得api接口
① 使用调试工具/提取工具
调试工具是青果为开发者推出的快速获取接口&调试的简便工具,传送门[>>调试工具](https://www.qg.net/tools/IPdebug.html)
使用调试工具,用户需要先在左侧栏目中选好产品及接口类型,并在右侧表格的参数值列中填写所需信息,便可在页面上方看到完整的【请求地址】,这便是提取IP的API接口。
点击【发送】还能快速调试,查看响应结果,确认该代理接口是否可用。

调试工具除了有提取IP接口,还提供查询在用IP、资源池、资源地区等接口。
若只需要提取IP,也可以使用提取工具,进行简单的选择便可以获取一样的接口链接。传送门[>>提取工具 ](https://www.qg.net/tools/IPget.html)

② 查看api接口文档
除了简便工具,开发者也可以通过更原始的接口文档,自主编写所需的接口链接。
**[点击查看API接口文档 >](https://www.qg.net/doc/product/6_258_274/2143.html)**
## 三、代理测试
在代理服务器中打开命令行,输入相应的代理信息进行运行,若响应成功,则代理可用。
以下图为例,通过curl命令测试账密模式的代理结果,查询IP并成功响应。
`curl -x http://{authkey}:{authpwd}@{118.92.69.112}:{32105} {targetUrl}`

若响应不成功,可对应[错误码表](https://www.qg.net/doc/1838.html),排查问题。
## 四、编写采集程序
测试代理可用后,便可开始编写代理采集程序了。
青果提供了多种编程语言的代码示例供开发者参考,
详情查看
- [C语言代码示例](https://www.qg.net/doc/sdk/9_230/1694.html)
- [Go语言代码示例](https://www.qg.net/doc/sdk/9_230/1695.html)
- [PHP语言代码示例](https://www.qg.net/doc/sdk/9_230/1696.html)
- [Python语言代码示例](https://www.qg.net/doc/sdk/9_230/1697.html)
- [Java语言代码示例](https://www.qg.net/doc/sdk/9_230/1698.html)
- [Shell语言代码示例](https://www.qg.net/doc/sdk/9_230/1699.html)
- [C#语言代码示例](https://www.qg.net/doc/sdk/9_230/1700.html)
- [Node语言代码示例](https://www.qg.net/doc/sdk/9_230/1701.html)
**注:**青果代理IP产品都有相对应的IP存活周期,其有效时长是从提取到IP时算起,超过这个时长IP会失效。
独享代理开发者指南
青果为有经验的开发者提供多种API接口及代码示例,以协助开发者更便利地使用代理。
本篇仅以【提取IP】这一操作为例,介绍如何使用API接口-代码方式来使用代理。
## 步骤总览

## 一、API鉴权与代理授权
青果支持开发者对API鉴权和代理授权验证进行自主管理,以下介绍这一阶段的操作
**API鉴权**是指对调用API接口的服务器身份进行验证的功能。启用鉴权可以提高安全性,用户可以根据需要选择启用或关闭该功能。
用户可根据意愿选择开启和关闭API鉴权(默认关闭),青果提供的鉴权方式有密码和白名单两种,在对应业务【操作】-【业务设置】-【API鉴权/白名单】中进行设置即可。


**代理授权验证**是指对代理身份进行验证,只有通过对应信息才能使用该代理IP,确保您的使用权益和安全性。
青果代理IP支持白名单和帐密两种验证方式,可自主选择使用。
白名单模式,即把要实现代理的服务器IP添加进代理白名单中,后续使用该IP连接代理就能成功;
账密模式,即先获取该代理业务的账号密码信息,连接代理时填入账密进行验证就可使用代理。
白名单设置的入口与API鉴权一样。

详细步骤可查看>[如何使用API鉴权](https://www.qg.net/doc/2283.html)、[代理验证](https://www.qg.net/doc/1574.html)
## 二、获取api接口
青果给开发者提供两种方式来获得api接口
① 使用调试工具/提取工具
调试工具是青果为开发者推出的快速获取接口&调试的简便工具,传送门[>>调试工具](https://www.qg.net/tools/IPdebug.html)
使用调试工具,用户需要先在左侧栏目中选好产品及接口类型,并在右侧表格的参数值列中填写所需信息,便可在页面上方看到完整的【请求地址】,这便是提取IP的API接口。
点击【发送】还能快速调试,查看响应结果,确认该代理接口是否可用。

调试工具除了有提取IP接口,还提供查询在用IP、资源池、资源地区等接口。
若只需要提取IP,也可以使用提取工具,进行简单的选择便可以获取一样的接口链接。传送门[>>提取工具 ](https://www.qg.net/tools/IPget.html)

② 查看api接口文档
除了简便工具,开发者也可以通过更原始的接口文档,自主编写所需的接口链接。
**[独享代理API接口文档 >](https://www.qg.net/doc/product/6_257_271_272/2141.html)**
**[独享代理(地区锁)API接口文档 > ](https://www.qg.net/doc/product/6_257_271_273/2142.html)**
## 三、代理测试
在代理服务器中打开命令行,输入相应的代理信息进行运行,若响应成功,则代理可用。
以下图为例,通过curl命令测试账密模式的代理结果,查询IP并成功响应。
`curl -x http://{authkey}:{authpwd}@{118.92.69.112}:{32105} {targetUrl}`

若响应不成功,可对应[错误码表](https://www.qg.net/doc/1838.html),排查问题。
## 四、编写采集程序
测试代理可用后,便可开始编写代理采集程序了。
青果提供了多种编程语言的代码示例以供开发者参考,
详情查看
- [C语言代码示例](https://www.qg.net/doc/sdk/9_230/1694.html)
- [Go语言代码示例](https://www.qg.net/doc/sdk/9_230/1695.html)
- [PHP语言代码示例](https://www.qg.net/doc/sdk/9_230/1696.html)
- [Python语言代码示例](https://www.qg.net/doc/sdk/9_230/1697.html)
- [Java语言代码示例](https://www.qg.net/doc/sdk/9_230/1698.html)
- [Shell语言代码示例](https://www.qg.net/doc/sdk/9_230/1699.html)
- [C#语言代码示例](https://www.qg.net/doc/sdk/9_230/1700.html)
- [Node语言代码示例](https://www.qg.net/doc/sdk/9_230/1701.html)
**注:**青果代理IP产品都有相对应的IP存活周期,其有效时长是从提取到IP时算起,超过这个时长IP会失效。
长效代理开发者指南
青果为有经验的开发者提供多种API接口及代码示例,以协助开发者更便利地使用代理。
本篇仅以【提取IP】这一操作为例,介绍如何使用API接口-代码方式来使用代理。
## 步骤总览

## 一、API鉴权与代理授权
青果支持开发者对API鉴权和代理授权验证进行自主管理,以下介绍这一阶段的操作
**API鉴权**是指对调用API接口的服务器身份进行验证的功能。启用鉴权可以提高安全性,用户可以根据需要选择启用或关闭该功能。
用户可根据意愿选择开启和关闭API鉴权(默认关闭),青果提供的鉴权方式有密码和白名单两种,在对应业务【操作】-【业务设置】-【API鉴权/白名单】中进行设置即可。


**代理授权验证**是指对代理身份进行验证,只有通过对应信息才能使用该代理IP,确保您的使用权益和安全性。
青果代理IP支持白名单和帐密两种验证方式,可自主选择使用。
白名单模式,即把要实现代理的服务器IP添加进代理白名单中,后续使用该IP连接代理就能成功;
账密模式,即先获取该代理业务的账号密码信息,连接代理时填入账密进行验证就可使用代理。
白名单设置的入口与API鉴权一样。

详细步骤可查看>[如何使用API鉴权](https://www.qg.net/doc/2283.html)、[代理验证](https://www.qg.net/doc/1574.html)
## 二、获取api接口
青果给开发者提供两种方式来获得api接口
① 使用调试工具/提取工具
调试工具是青果为开发者推出的快速获取接口&调试的简便工具,传送门[>>调试工具](https://www.qg.net/tools/IPdebug.html)
使用调试工具,用户需要先在左侧栏目中选好产品及接口类型,并在右侧表格的参数值列中填写所需信息,便可在页面上方看到完整的【请求地址】,这便是提取IP的API接口。
点击【发送】还能快速调试,查看响应结果,确认该代理接口是否可用。

调试工具除了有提取IP接口,还提供查询在用IP、资源池、资源地区等接口。
若只需要提取IP,也可以使用提取工具,进行简单的选择便可以获取一样的接口链接。传送门[>>提取工具 ](https://www.qg.net/tools/IPget.html)

② 查看api接口文档
除了简便工具,开发者也可以通过更原始的接口文档,自主编写所需的接口链接。
**[点击查看API接口文档 >](https://www.qg.net/doc/product/6_258_274/2143.html)**
## 三、代理测试
在代理服务器中打开命令行,输入相应的代理信息进行运行,若响应成功,则代理可用。
以下图为例,通过curl命令测试账密模式的代理结果,查询IP并成功响应。
`curl -x http://{authkey}:{authpwd}@{118.92.69.112}:{32105} {targetUrl}`

若响应不成功,可对应[错误码表](https://www.qg.net/doc/1838.html),排查问题。
## 四、编写采集程序
测试代理可用后,便可开始编写代理采集程序了。
青果提供了多种编程语言的代码示例以供开发者参考,
详情查看
- [C语言代码示例](https://www.qg.net/doc/sdk/9_230/1694.html)
- [Go语言代码示例](https://www.qg.net/doc/sdk/9_230/1695.html)
- [PHP语言代码示例](https://www.qg.net/doc/sdk/9_230/1696.html)
- [Python语言代码示例](https://www.qg.net/doc/sdk/9_230/1697.html)
- [Java语言代码示例](https://www.qg.net/doc/sdk/9_230/1698.html)
- [Shell语言代码示例](https://www.qg.net/doc/sdk/9_230/1699.html)
- [C#语言代码示例](https://www.qg.net/doc/sdk/9_230/1700.html)
- [Node语言代码示例](https://www.qg.net/doc/sdk/9_230/1701.html)
**注:**青果代理IP产品都有相对应的IP存活周期,其有效时长是从提取到IP时算起,超过这个时长IP会失效。
长效代理-使用指南-手动版
## 步骤总览

------------
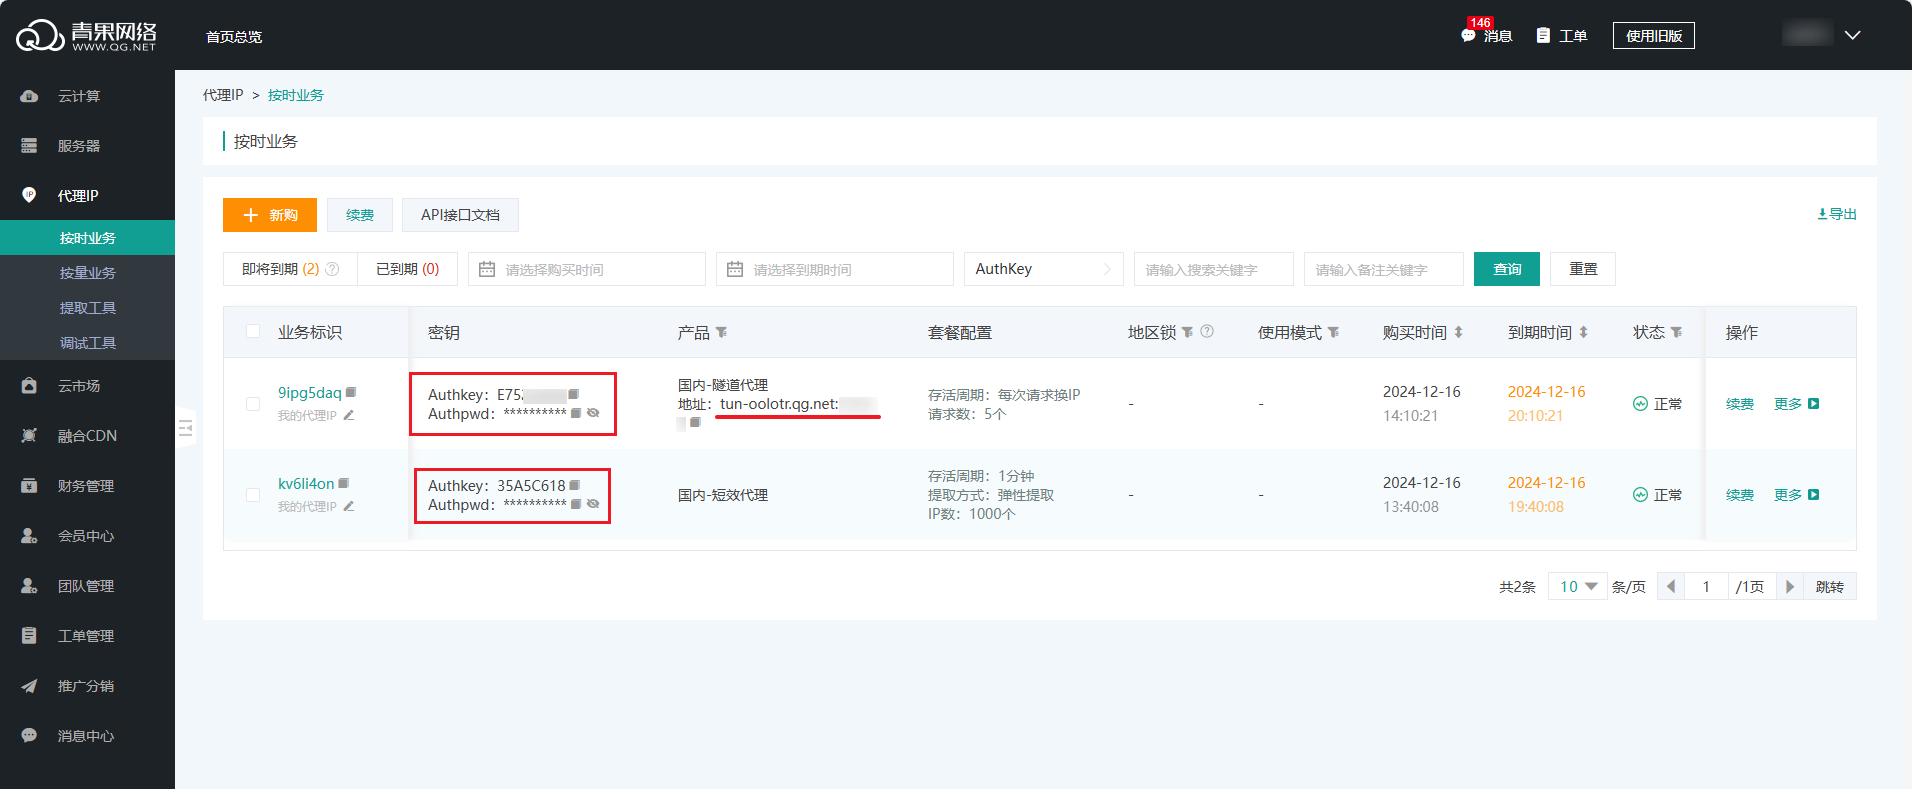
完成购买后,即可在控制台看到相关业务信息。
后续使用代理,最重要的便是密钥信息(隧道代理使用的是地址信息)。
下面介绍手动设置 使用代理的具体步骤。
## 一、授权验证
为保障用户使用代理的权益和安全性, 正式使用前需要进行授权验证。
青果支持白名单和帐密两种验证方式,可自主选择使用。
白名单模式,即把要实现代理的服务器IP添加进代理白名单中,后续使用该IP连接代理就能成功;
账密模式,即先获取该代理业务的密钥信息(即图中的Authkey与Authpwd),连接代理时填入进行验证就可使用代理。
详细操作可查看[代理验证 >](https://www.qg.net/doc/use/8_244/1574.html)
## 二、提取IP
确认好验证方式后,就可以开始提取IP了。
1.用户可以点击对应业务右侧的【更多】-【IP使用】-【提取IP】进入提取工具页面,也可以点击左侧导航栏的【提取工具】进入;
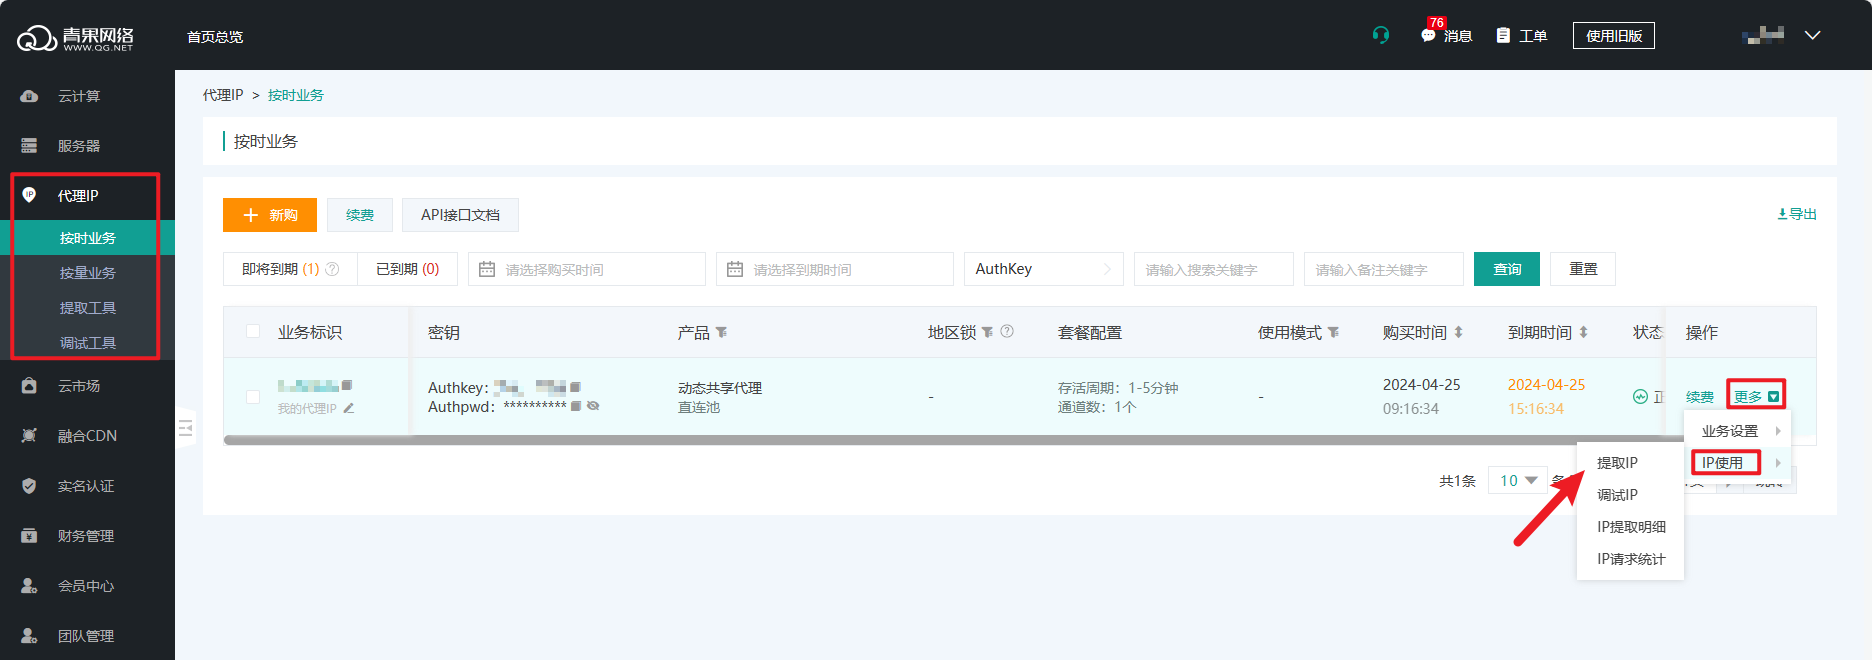
**请注意,**目前国内代理IP和全球HTTP的产品,除了按量提取对应的套餐是按量业务之外,其他产品都属于按时业务。
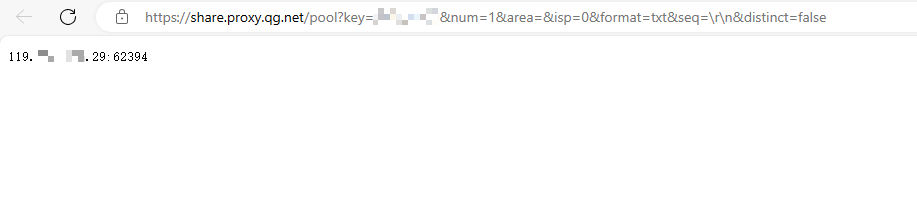
2.在提取工具页面,选择对应业务的Authkey,以及提取数量、地区、格式等其他选项,便可在页面下方看到链接,点击【打开链接】;
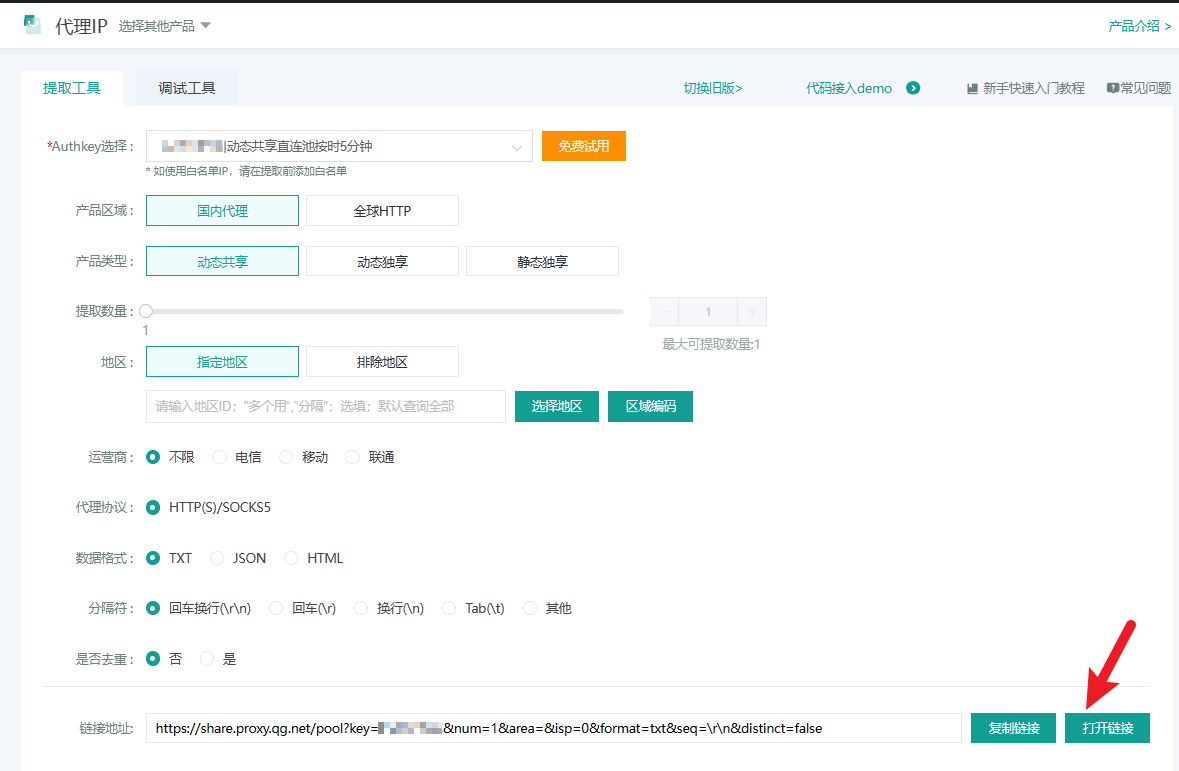
便可在打开的网页中看到此时提取到的IP地址。
## 三、测试使用
做好以上步骤之后,即可开始连接代理测试。
青果代理IP支持用户使用各种浏览器、代理客户端、电脑系统等等进行代理设置。
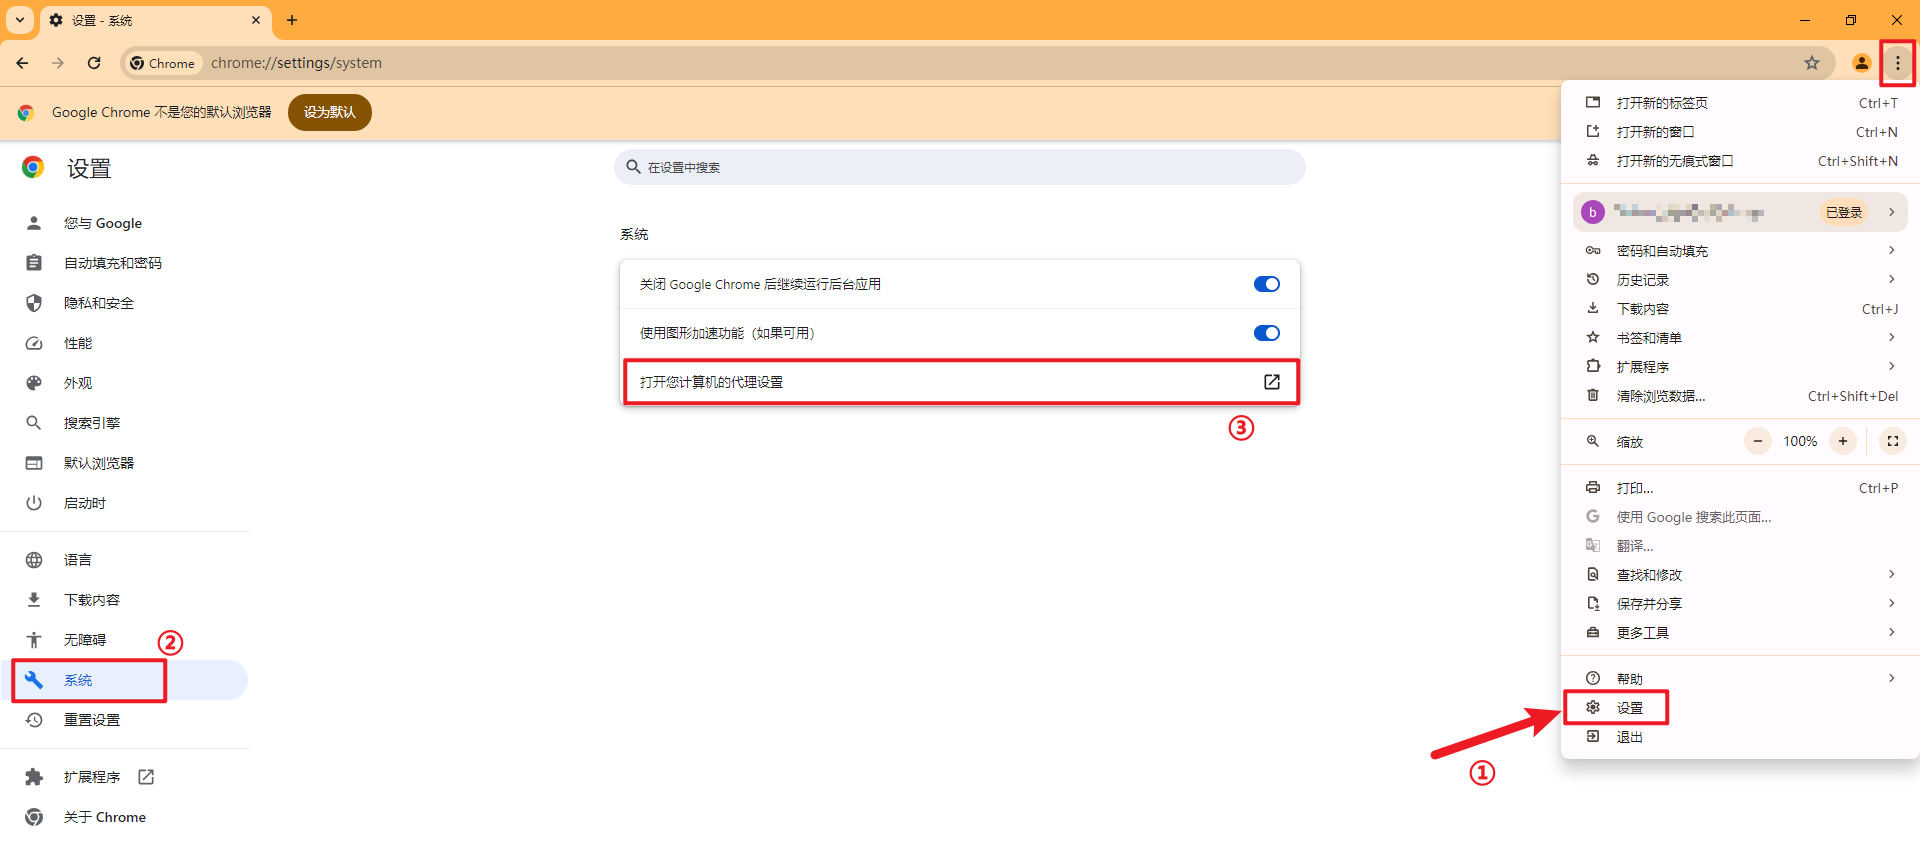
以谷歌浏览器chrome为例,设置代理需要1.在右上角菜单中点击【设置】,设置页面中选择【系统】-【打开代理设置】;
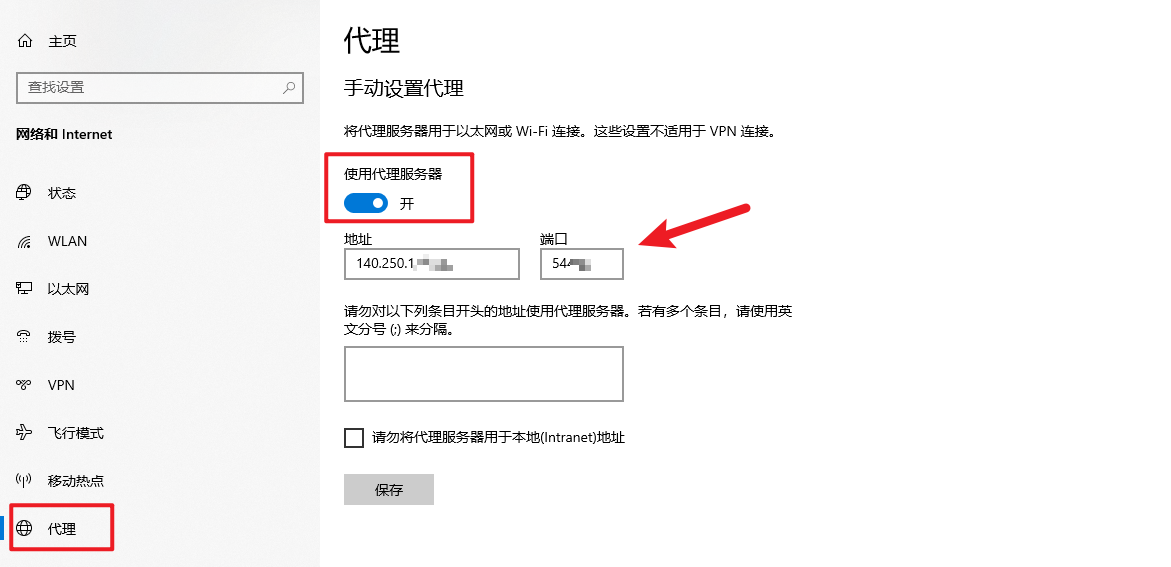
2.在新打开的弹窗页面中,把【使用代理服务器】按钮打开,并填写地址与端口信息,点击保存,就算启动代理连接了;
3.若使用的是账密验证,此时在浏览器打开一个新网页,会弹出以下会话,填写业务所对应的AuthKey以及AuthPwd信息,点击确认便能完成代理连接;
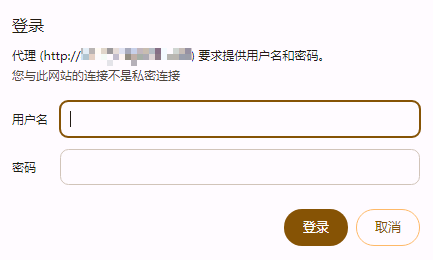
若使用的是白名单验证,则跳过该步骤。
4.此时进行正常的网页浏览,若能正常使用,就算代理连接成功了。
**[点击查看更多的浏览器、电脑系统、软件设置代理指南 >](https://www.qg.net/doc/2238.html)**
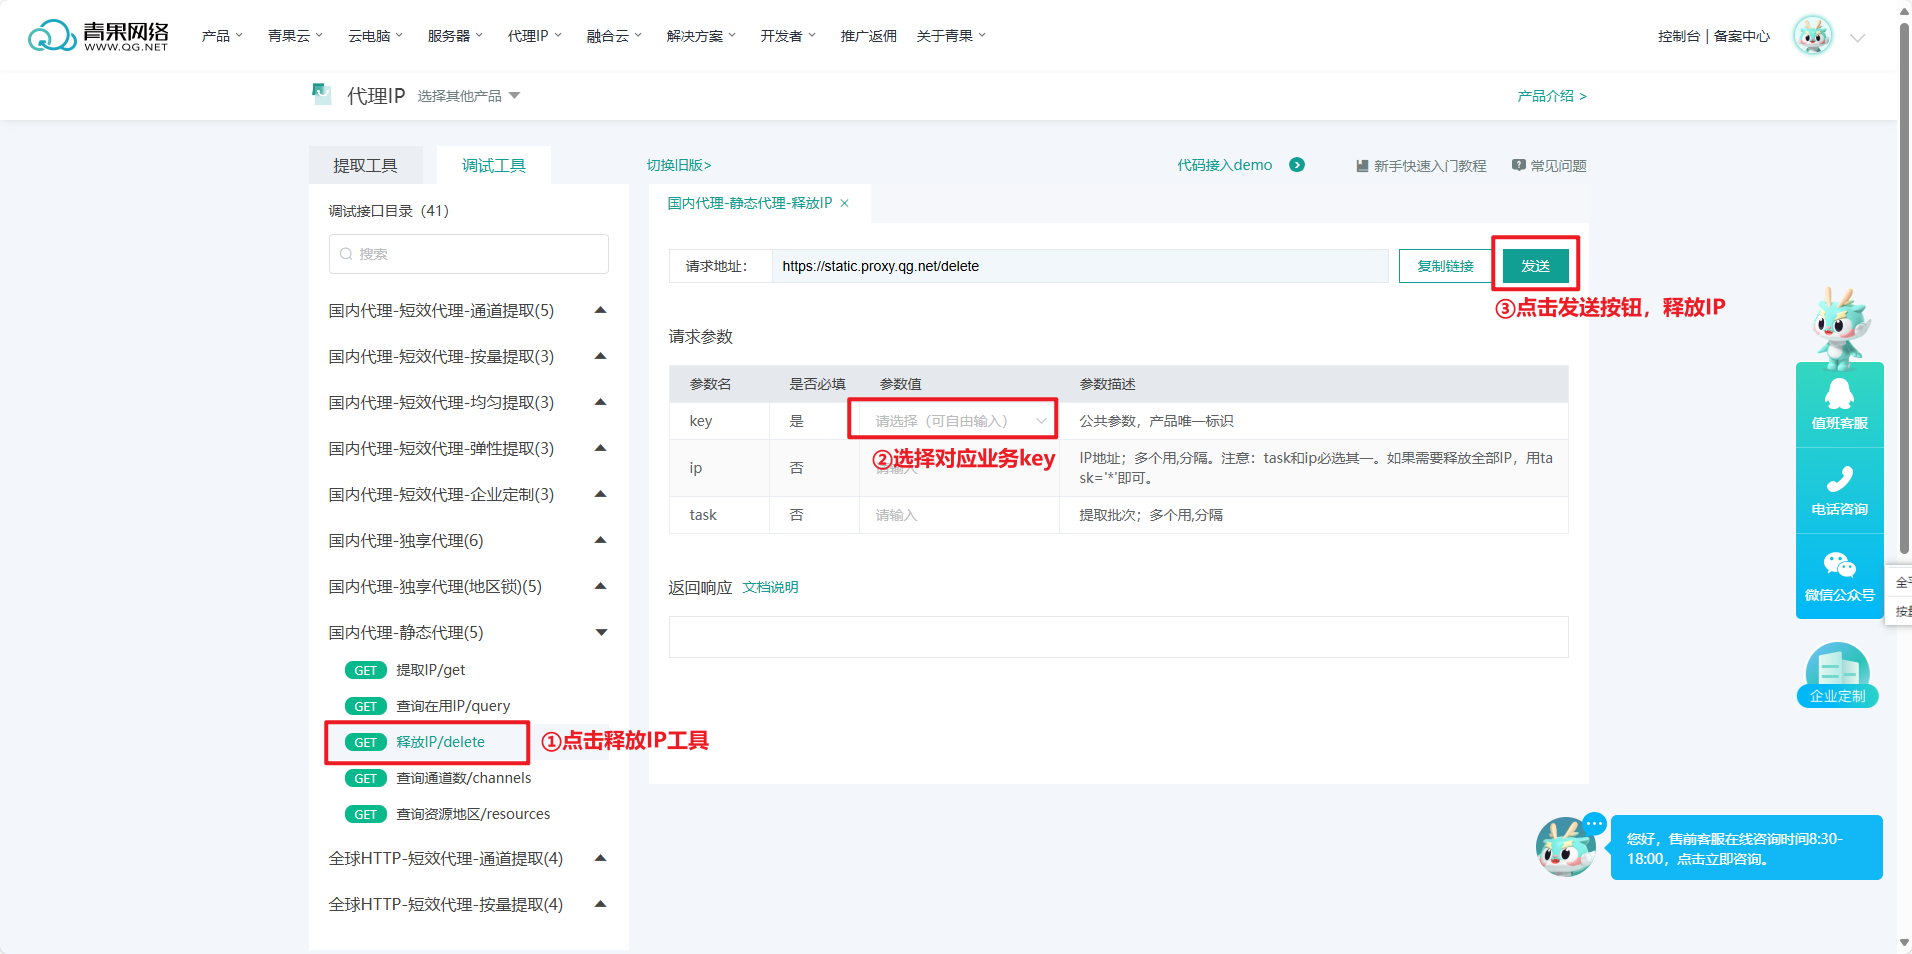
## 四、释放IP
青果长效代理,不同产品及套餐获取新IP的方式是不一样的。
**静态类型产品**中,普惠版产品IP长期固定不变,您可长期使用无需释放和获取新IP。
而高级版产品,IP可根据用户需求,自主释放并获取新的静态IP,释放频次是原IP使用24小时起,1周最多释放2次。
【动作指引】:用户可在调试工具页面进行释放IP的操作。释放成功后,即可重新获取IP。
**动态类型产品**,IP是自然失效的,失效后IP将自动释放,用户需要回到第一步重新提取IP,再将新ip信息填入代理服务器中进行使用。
另外,动态长效产品升级了隧道转发功能----可在IP失效释放后,自动连接新IP,省去重新提取IP的步骤,用户可根据需求选择附加功能。
短效代理(全球HTTP)-使用指南-手动版
**全球HTTP均不支持在中国大陆地区网络环境下使用。**

------------
代理IP产品 完成购买后,即可在控制台看到相关业务信息。
后续使用代理,最重要的便是密钥信息(隧道代理使用的是地址信息)。

下面介绍手动设置 使用代理的具体步骤。
## 一、授权验证
为保障用户使用代理的权益和安全性, 正式使用前需要进行授权验证。
青果支持白名单和帐密两种验证方式,可自主选择使用。
白名单模式,即把要实现代理的服务器IP添加进代理白名单中,后续使用该IP连接代理就能成功;
账密模式,即先获取该代理业务的密钥信息(即图中的Authkey与Authpwd),连接代理时填入进行验证就可使用代理。

详细操作可查看[代理验证 >](https://www.qg.net/doc/use/8_244/1574.html)
## 二、提取IP
确认好验证方式后,就可以开始提取IP了。
1.用户可以点击对应业务右侧的【更多】-【IP使用】-【提取IP】进入提取工具页面,也可以点击左侧导航栏的【提取工具】进入;

**请注意,**目前国内代理IP和全球HTTP的产品,除了按量提取对应的套餐是按量业务之外,其他产品都属于按时业务。
2.在提取工具页面,选择对应业务的Authkey,以及提取数量、地区、格式等其他选项,便可在页面下方看到链接,点击【打开链接】;

便可在打开的网页中看到此时提取到的IP地址。

## 三、测试使用
做好以上步骤之后,即可开始连接代理测试。
青果代理IP支持用户使用各种浏览器、代理客户端、电脑系统等等进行代理设置。
以谷歌浏览器chrome为例,设置代理需要1.在右上角菜单中点击【设置】,设置页面中选择【系统】-【打开代理设置】;

2.在新打开的弹窗页面中,把【使用代理服务器】按钮打开,并填写地址与端口信息,点击保存,就算启动代理连接了;
3.若使用的是账密验证,此时在浏览器打开一个新网页,会弹出以下会话,填写业务所对应的AuthKey以及AuthPwd信息,点击确认便能完成代理连接;

若使用的是白名单验证,则跳过该步骤。
4.此时进行正常的网页浏览,若能正常使用,就算代理连接成功了。
**[点击查看更多的浏览器、电脑系统、软件设置代理指南 >](https://www.qg.net/doc/2238.html)**
## 四、重新获取IP
青果代理IP产品都有相对应的IP存活周期,其有效时长是从提取到IP时算起,超过这个时长IP会失效。
IP到期失效之后,需要回到第一步重新提取IP,再将新ip信息填入代理服务器中进行使用。
独享代理-使用指南-手动版
## 步骤总览

------------
完成购买后,即可在控制台看到相关业务信息。
后续使用代理,最重要的便是密钥信息(隧道代理使用的是地址信息)。

下面介绍手动设置 使用代理的具体步骤。
## 一、授权验证
为保障用户使用代理的权益和安全性, 正式使用前需要进行授权验证。
青果支持白名单和帐密两种验证方式,可自主选择使用。
白名单模式,即把要实现代理的服务器IP添加进代理白名单中,后续使用该IP连接代理就能成功;
账密模式,即先获取该代理业务的密钥信息(即图中的Authkey与Authpwd),连接代理时填入进行验证就可使用代理。

详细操作可查看[代理验证 >](https://www.qg.net/doc/use/8_244/1574.html)
## 二、提取IP
确认好验证方式后,就可以开始提取IP了。
1.用户可以点击对应业务右侧的【更多】-【IP使用】-【提取IP】进入提取工具页面,也可以点击左侧导航栏的【提取工具】进入;

**请注意,**目前国内代理IP和全球HTTP的产品,除了按量提取对应的套餐是按量业务之外,其他产品都属于按时业务。
2.在提取工具页面,选择对应业务的Authkey,以及提取数量、地区、格式等其他选项,便可在页面下方看到链接,点击【打开链接】;

便可在打开的网页中看到此时提取到的IP地址。

## 三、测试使用
做好以上步骤之后,即可开始连接代理测试。
青果代理IP支持用户使用各种浏览器、代理客户端、电脑系统等等进行代理设置。
以谷歌浏览器chrome为例,设置代理需要1.在右上角菜单中点击【设置】,设置页面中选择【系统】-【打开代理设置】;

2.在新打开的弹窗页面中,把【使用代理服务器】按钮打开,并填写地址与端口信息,点击保存,就算启动代理连接了;
3.若使用的是账密验证,此时在浏览器打开一个新网页,会弹出以下会话,填写业务所对应的AuthKey以及AuthPwd信息,点击确认便能完成代理连接;

若使用的是白名单验证,则跳过该步骤。
4.此时进行正常的网页浏览,若能正常使用,就算代理连接成功了。
**[点击查看更多的浏览器、电脑系统、软件设置代理指南 >](https://www.qg.net/doc/2238.html)**
## 四、重新获取IP
青果代理IP产品都有相对应的IP存活周期,其有效时长是从提取到IP时算起,超过这个时长IP会失效。
IP到期失效之后,需要回到第一步重新提取IP,再将新ip信息填入代理服务器中进行使用。
长效代理-产品介绍
## 1 产品简介
长效代理是以高性能云主机为主,一手散段IP资源为辅建设的高品质代理服务器,青果除了为客户提供可以长期持有的静态IP之外,还有多种存活时长(1天以上)、可动态切换的长效IP资源。
【静态类型】:普惠版与高级版,普惠版的IP是长期不变的,独享带宽高稳定性。而高级版特别提供了自主更换IP的功能,一周可自主更换**2**次。
【动态类型】:IP存活时长为数小时到数天范围内自然失效,有低带宽和高带宽套餐可选。且可附加隧道转发功能,IP失效之后将自动连接新IP(未勾选隧道功能的,需重新提取IP)。
长效代理使用非常方便,只需几分钟,您就可以通过[API链接](https://www.qg.net/tools/IPget.html?type=1-1)获取代理IP并参照[代码样例](https://www.qg.net/list/192.html)集成到您的程序中。
## 2 产品优势
- IP时长可控,自主释放,可用时长从24小时到365天全覆盖,满足多场景需求;
- 真实IP地址,IP稳定性强;
- 提供丰富的API接口,调用方便快捷。
- IP真实,全年7x24小时稳定可用
- 静态类型独享带宽和IP,稳定性强
- 极速(访问百度测试,响应时间<1秒)
- 支持指定获取某个城市IP或全国随机
## 3 适合人群
适用于需要业务环境隔离或长期固定IP的业务场景。
## 4 付费模式
静态产品提供普通版和高级版两种套餐,对应不同价格
- 普惠版产品IP长期不变,
- 高级版可根据需求,一周内可自主更换两次。
皆为按时计费 模式,可按周、按月、按年付费。
动态产品提供不同带宽的两个套餐,对应不同价格。
## 5 产品属性
- 免费白名单数量:256
- 支持协议:HTTP/HTTPS/SOCKS5
- 单IP最大连接数:1000
- 单IP带宽限制:静态普惠版1Mbps,静态高级版2Mbps。动态有2M和5M选择。
- 终端数限制:无限制
- 提取资源频率: (通道数*5+10 ) 次/分钟
- 单次提取IP上限:100个
## 6 用途
**长效代理可用于:**
- 跨境电商店铺运营
- 观看视频
- 舆情监测
- 广告检测
- 直播/短视频数据监控分析
**不适用于以下场景**
- 访问谷歌等国内正常无法访问的网站;
- 大文档、音乐、视频等大文件下载;
- 登录和访问色情、赌博等不健康的网站;
- 用于网络攻击等违法行为。
## 7 使用指南
长效代理使用非常方便,您可以选择①**手动设置**代理IP并在浏览器中使用,
也可以通过②**API接口获取**代理并参照代码样例集成到您的程序中。
具体请查看
- [手动设置代理指南 >](https://www.qg.net/doc/product/6_258_281/2268.html)
- [开发者使用代理指南 >](https://www.qg.net/doc/product/6_258_281/1795.html)
##8 产品购买
- [短效代理 >](https://www.qg.net/business/proxyip/2.html?region=domestic&product_type=1&pool_type=2&extract_mode=4&spec_idx=0&num_idx=0&time_idx=3&number=1000&authkey_type=0 )
- [隧道代理 >](https://www.qg.net/business/proxyip/42.html?region=domestic&product_type=3&pool_type=1&extract_mode=1&spec_idx=0&num_idx=0&time_idx=3&number=5&authkey_type=0 )
- [独享代理 >](https://www.qg.net/business/proxyip/6.html?region=domestic&product_type=2&pool_type=1&extract_mode=1&spec_idx=0&num_idx=0&time_idx=2&number=1&authkey_type=0)
- [长效代理 >](https://www.qg.net/business/proxyip/6.html?region=domestic&product_type=4&pool_type=1&extract_mode=1&spec_idx=0&num_idx=0&time_idx=2&number=1&authkey_type=0 )